Special RASA Light Analysis
There many factors that come into play when considering what size scope to get and what size sensor to pair with it. With so many telescope manufacturers claiming to provide ‘full frame’ capability or a fully illuminated full frame field, it’s hard to really believe it and/or trust their marketing material.
When you introduce a full frame sensor, you have a diagonal sensor around 43mm. 48mm optical trains should easily cover that area correct? This can be wrong in some situations because at faster F/2 speeds, your light cone coming from the RASA to your sensor is steeper than normal.
Take this image for example, not to scale, but illustrates that a slower refractor with F/7 compared to the light cone of F/2 is much narrower. The slower F/7 present well with a narrow optical train setup this way, but the F/2 is gathering more light, thus the speed increase. Steeper light curves mean you need to accommodate that in the optical train you run. 48mm may still obstruct a full frame sensor!
So the question soon becomes how big of an optical pathway do you need on a RASA 11 with a full frame sensor?

RASA 11 Image Analysis
After further analysis of this, I constructed 3D models of a light cone that comes in on a RASA 11 and the optimal filter coverage per a full frame sensor. Built to scale, this can easily show how the optimal Camera Mount, Rotator, and Filter Slider can greatly impact the full power of such a fast optical scope. This test shows that a Fast RASA 11 F/2.2 scope can achieve full corner to corner optimal performance with a full frame camera sensor using the proper 50x50mm filters and assemblies. The M68 RASA mount is almost essential to get the lower portion of the light cone into its max operational state, though smaller M54 systems work well with flats correcting vignetting and only slightly hindering top performance.
RASA 11 with Full Frame Sensor (Perpendicular)
In this scenario, we take the actual light cone that will cover a 43.3mm full frame sensor and we create its cone at F/2.2 to give it the actual spread occurring across a 72.8mm backfocal system.
We required an M68 camera mount to be wide enough at the base to not obstruct the light cone at this speed. We then use 50x50mm Square filters attached to our Photon Cage. While we do get obstruction from the 50x50mm filter mounts and screws, they are not in the obstruction zone of the actual lens since it is perpendicular to the sensor.
Notice the extra space at the sensor level which would allow a cross section of the filter screws to not obstruct that portion of the rectangular sensor.
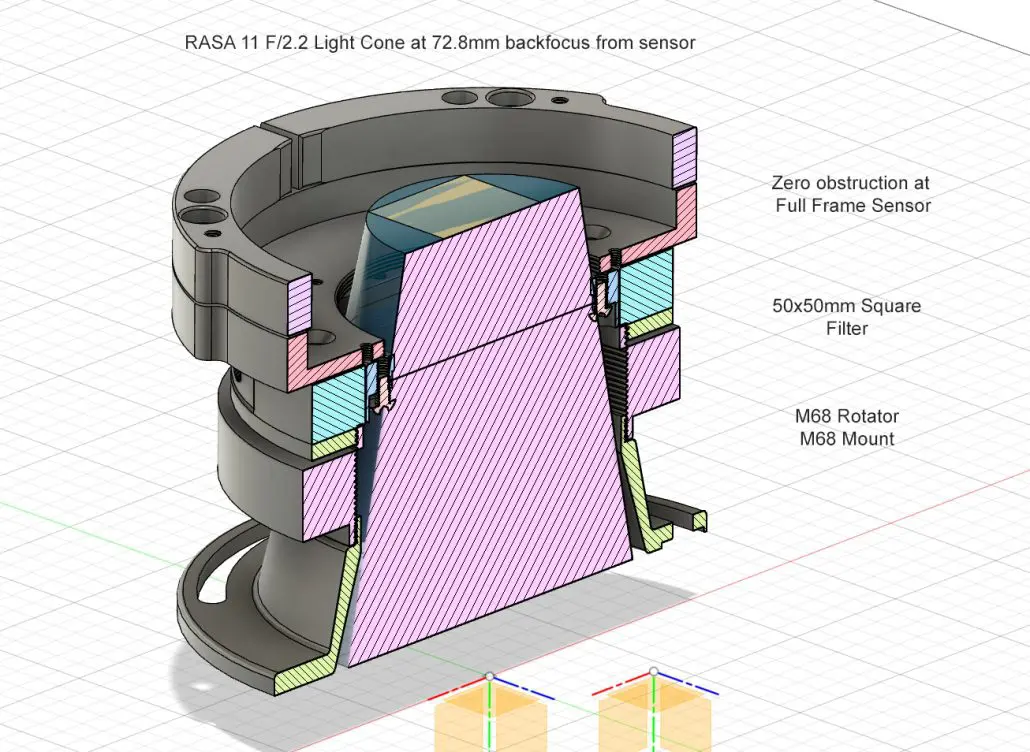
RASA 11 with Full Frame Sensor (Diagonal with 50x50mm filter)
Next, we take a cross section at the widest sensor area to also review the cross section design. The M68 base doesn’t contact or reach the light cone in anyway, nor does the 50x50mm filter system as it offers zero obstruction.

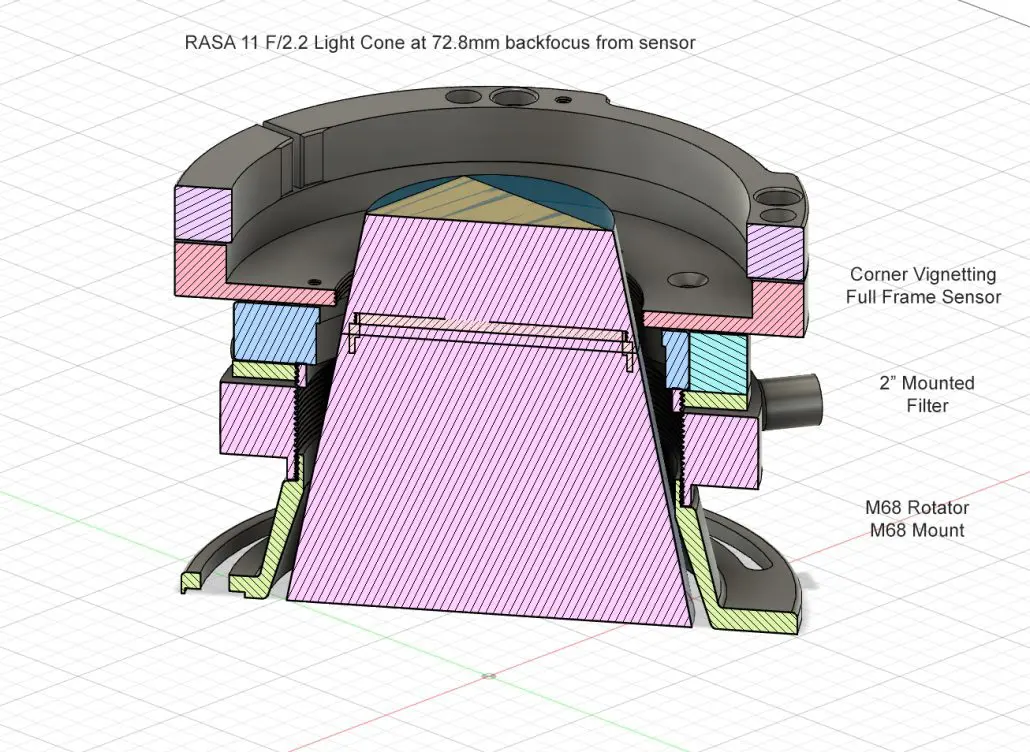
RASA 11 with Full Frame Sensor (Diagonal with 2″ Filter)
Last, we take the same Diagonal cross section but apply a 2″ filter into this light cone portion of our sensor. Notice how there is significant obstruction from the 2″ filter assembly at the level of which the filter will sit.
This distance is pretty consistent with most full frame sensors and filter trays sitting around the 16-18mm mark away from the sensor. Given most full frame ZWO cameras are 12.5mm backfocus. The situation would increase and the 2″ filter will get worse if using a larger backfocus camera such as a QHY 600 as it only exacerbates the issue of not being closer to the sensor.
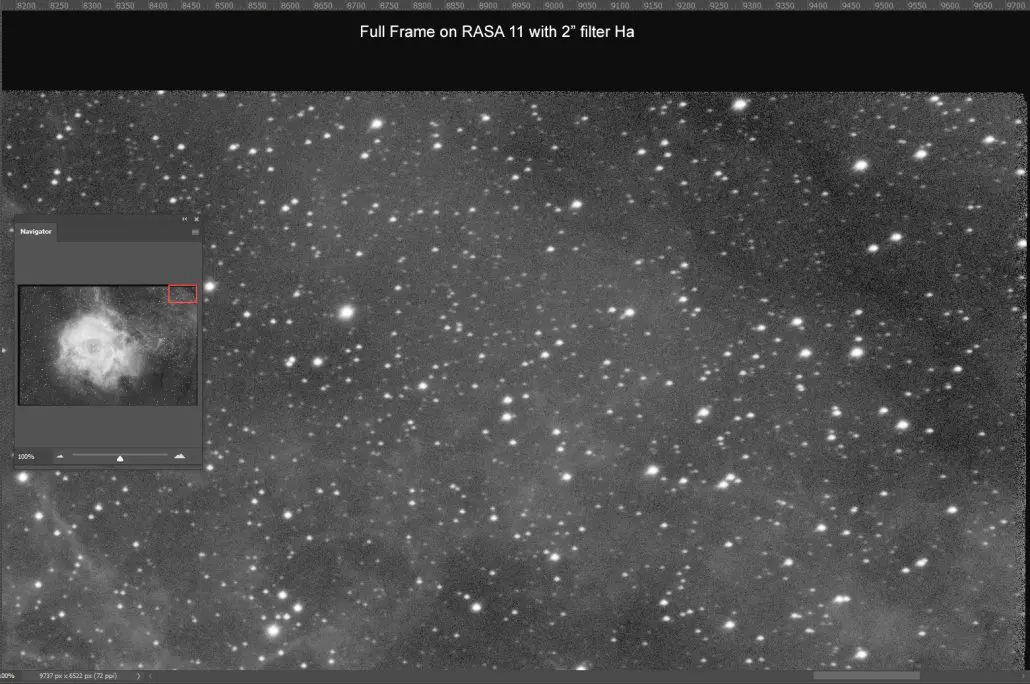
RASA 11 with Full Frame Sensor & 2″ Filters
This image is taken with 2″ round Baader mounted filter using an M54 camera mount. It provides good quality imagery up until the very tips of the image stack showing some artifacts and star obstruction.
The vignetting is to be expected, as Celestron notes some light lose in the corner is going to happen regardless. Often telescope manufacters will slow down the edge rays to improve the flatness and star quality at edge performance. Flats take care of the vignetting quite well with this setup and minor cropping would be needed to remove those edge stars.

RASA 11 with Full Frame Sensor & 50x50mm Filters
In this image, we take the same RASA 11 with full frame sensor and our M68 camera mount. We used a 50x50mm square Astronomik MaxFR Ha filter. We can see we get very round stars in the corners compared to our exact same setup using 2″ filters. The corner tips are very round and symmetrical in a system that has almost no tilt or backfocus issues present.
Both images have been stacked and show a variety of images that have been dithered and removes the issues of single sub exposure issues, guiding issues, etc. The 50x50mm corner to corner performance is very consistent on all 4 edges and would be perfectly usable with very little cropping other than dither zones on the edge.
Ready to build your unit?
View Pricing and Availability, or email us for more info!
When to go M42, M48, M54, or M68 with your optical train?
I will just put it out there what my opinions are, and they are only that from the experience I have with a variety of RASA configurations. Your results may vary, so take all this as just a suggestion.
RASA 11
RASA 11 with Full Frame Sensor (ie: ASI 6200, QHY600) – ( PRO Edition- M68) – If you can afford it, go with M68 mount, M68 rotator, M68 PRO filter slider with 50x50mm filters. You will be at the max of the scopes ability, you will still see vignetting from the scope itself but with no obstruction from accessories. M54 will work in this situation but with reduced optimal performance, slight vignetting, slight corner coma, and best used with 2″ filter systems and good flats.
RASA 11 with APS-C Sensor (ie: ASI 2600, QHY 268) – (Standard Edition M54 or PRO Edition- M68) – This combination is excellent with a RASA 11 but with smaller FOV of course. It works well with M54 and 2″ filters with good flats to produce quality images to the edges. M68 can help in this situation all the way through if cost is not an option and 50x50mm filters are available, but it isn’t as necessary as the Full Frame setup.
RASA 11 with smaller sensors (ie: 1600) – (Standard Edition M54) – This combination can use the stock M48 system with 2″ filters fairly well, though an M54 setup will allow almost no vignetting and very flat images with the Photon Cage. The small FOV is not utilizing nearly the full power of the RASA at this stage though with such small sensor models, and the felt backed stock M48 camera mount is often susceptible to tilt.
RASA 8
RASA 8 with Full Frame Sensor (ie: ASI 6200, QHY600) – (Not Recommended) – This combination is a no go. RASA 8’s are only designed for up to a APS-C sensor and work well with the M42 stock adapter and/or our 2″ filter slider andPhoton Cage designed specifically for this setup and super short backfocus.
RASA 8 with APS-C Sensor (ie: ASI 2600, QHY 268) – (RASA 8 Edition with Slider) – This setup is very good on a RASA 8 with the 2″ filters and our custom designed modular base system specifically for large camera 2600 and RASA 8 with removable filter sliders. This setup gives you a huge FOV at F/2 and flexibility to run Mono and is considered in our opinion a great combination.
RASA 8 with smaller sensors (ie: 1600) – (Standard Photon Cage with Standard Slider) – This combination can use the stock M42 RASA 8 camera mount + our stock filter slider system with 2″ filters and a small sensor to deliver very flat, non-vignetted images. This is an excellent combination.