Astro Photography Camera Pixel & Gain
Basic definitions and explanations of how Pixels & Gain work in Astro Imaging.
To understand Astrophotography, you first must master what it is we are discussing when it comes to your actual camera and light gathering tool. The telescope, mount, guiding systems, observatories and all other equipment lead up to this single moment in time when the photon that has been traveling for many many years finally touches down. Your camera and sensor are the final resting point when those photons need to be converted into your camera to digital units and cataloged and recorded.
Beginners Guide to Pixels
We all think of pixels on a camera or television monitor or computer screen as a dot. I believe most of us understand that principle and we can move past the basic pixel being a relative dot, but how is the light actually captured and converted in this, we want to discuss because it gives very clear understanding of how camera gain and exposure length come into play, which is our primary goal at the end of this section. So let’s jump into some basic language and definitions as we explore the pixel from start to finish.
Analog to Digital Unit (ADU)
Light that has travelled for many miles is about to hit your camera, we take what is considered an analog unit (photons) and we want to convert those to a digital unit or a signal that can thus be interpreted on a camera. Analog to Digital Units (ADU) are what use to measure those ‘hits’ of light that get converted. Photons hit your sensor and are converted electrons and count as a unit that is essentially converted to digital at this point.
Pixel Well Depth
So now that we have a photon crashing into your camera, converting to an electron and counting, we must discuss that a pixel is actually 3 dimensional. It’s like a water well hole in the ground, and that well is collecting rain drops in it. How deep your well goes is called the cameras “Full Well Depth” and you can see this on camera specifications. Pixels don’t just collect a single electron and turn on/off, rather they capture a gradient of light in this well depth, from pure black to full white. The deeper the well, the depth or image will be.
Imagine if you have a well with only a few electrons in that pixel well, you will have almost pure black, but if you fill that pixel well up with electrons to the top, you get pure white. And of course everything in between makes your gradients. So now you see the deeper the well, the more gradient your image can have. A camera with 20ke units of well depth vs a 50ke units of well depth are easy to understand… 50ke units being better gradients black to white.
Quantum Efficiency of your Pixel
Now that you have photons dropping into your pixels and understand that they are captured in this 3 dimension deep well, a camera will also have a specific Quantum Efficiency to it. While the word is fancy and scary scientific, it just means how efficient is it at capturing those photons. Some cameras are 60% efficient, others are 95% efficient.
Of course the higher efficiency, the better chance you capture and make better use of your time taking astro images. All sensors will miss some electron capturing, so a 100% QE factor is not going to be something to look for, but the higher the better.
Camera Gain
Now that we understand a pixel on our sensor, let’s discuss camera gain. Every camera manufacturer will give you specifics on the particular unit you look to purchase. These are important.
Unity Gain
You may here manufacturers talk about what the unity gain setting is for their given camera. What this is referring to is that one electron will convert to one digital unit in the pixel well. So if you have a camera which states unity gain is 100 or 139, then when you set the camera to that setting, for every electron strict that makes it to the pixel well (disregarding QE mess-ups), it will convert to one full digital unit on that pixel.
High Gain & Low Gain
There are no in-betweens when it comes to converting to a digital unit, you can not have 55.5 ADU, either you have a capture or you don’t, so it’s important to understand why you can change the gain of a camera.. and what the consequences of doing this will have. Some situations may call for low gain, some situations may call for high gain, it really depends on a lot of factors including what target you are capturing, your sky quality, and the equipment you use.
Let’s take low gain setting below unity. Why do it? Most manufacturers will provide a graph of the change in gain vs the change in well depth. The lower you go in gain, the higher the well depth becomes… hence those full well changes will give you more gradient. However, doing so means that it might take several electrons to equal one ADU. This means you often need longer exposures to capture more light since the gathering process will be slower.
Let’s take high gain setting above unity. Why do it? This is the opposite effect of low gain. Now when an electron strike comes into our pixel well, it can count as more than 1 ADU. it might be 1.2 it might be 2 ADU. You are making the pixel well fill up faster with fewer electrons. This is great right? You also will usually have less noise and shorter collection time frames for your exposures since it fills the pixel well quickly. The tradeoff here is you reduce your well depth.
Bit Depth (8 bit, 12 bit, 14 bit, 16bit?)
You may see all cameras come with specifications on your bit depth of your camera. This is another very important factor. Your well depth maybe 20ke or it maybe 50ke, which describes how deep that well goes, but it is meaningless unless we consider the actual measurement points along the way. Our Analog to Digital Converter can be in a variety of sizes, just like a tape measure may have feet, inches, quarter inch, eighth inch, maybe sixteenth of an inch markings on it, or maybe thirty-second inch markings for very precise measurements. Same holds true for our pixel well depth.
Just because a camera has a well depth of 50ke doesn’t mean much unless we know it has a lot of measurement indicators along that well depth. a camera with 8-bit ADC will have just a few ADU measurements, while a 12-bit or 16-bit has many more fractional measuring points for ADU. The higher the bit rate your camera offers the better because each of our electrons dropping into that bucket will get recorded. This is why you see more precise cameras with DEEP Full Well capacity and HIGH ADC bit rates.
Example Case Study
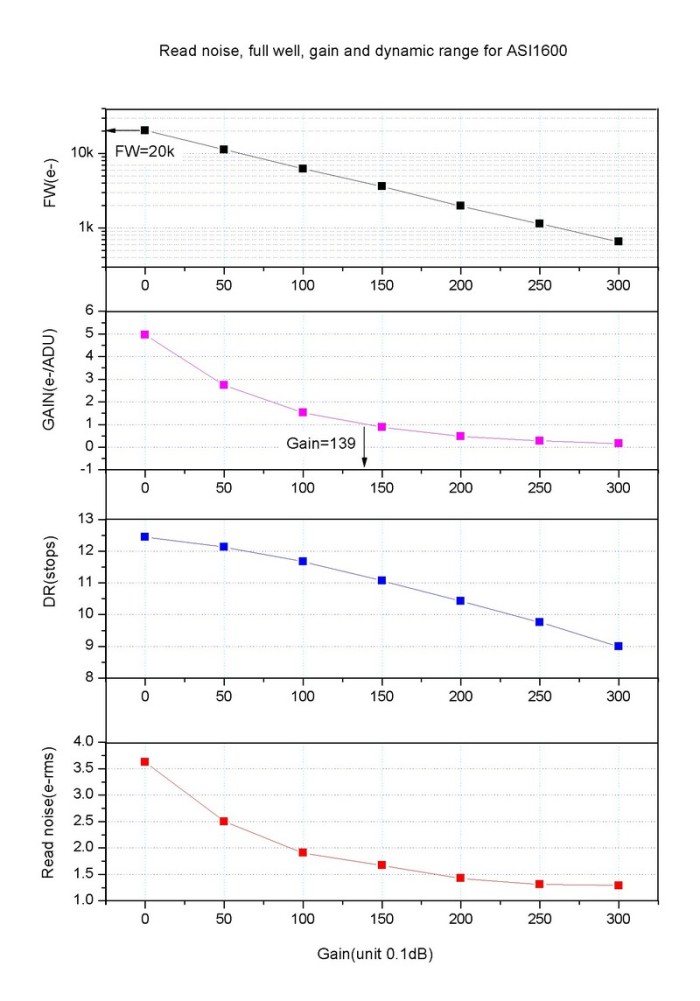
A good example is this graph from ZWO’s ASI 1600mm pro camera. A popular digital monochrome camera that shows us here some good information.
- Unity Gain is 139 (so one electron will be converted to one digital unit at this setting)
- Full Well capacity is 20,000 electrons if we use Gain 0. At unity gain our Full Well drops to around 4000 electrons!
- Gain at Unity shows 1 electron equals one digital unit, while at gain 0 it takes 5 electrons and gain 50 takes about 3 electrons.
- We can also see in this graph the relationship on low gain/high gain and Read Noise. High gains have less noise, low gains have more noise. Much noise can be eliminated with stacking images and dithering a telescope though.
In this graph, we can see the Quantum Efficiency of our camera and at which wavelengths. This manufacturer gives it’s efficiency rating at around 60%, while it can depend on which wavelength of light we look at. Good comparison to look at over a spectrum of cameras to make a good educated choice.

So what Gain & Exposure do you use?
This is a loaded question, and like asking which is better, Ford or Chevy. It can depend on a lot of factors such as how dark your skies are in your area, what Bortle zone you take from, what optical equipment you have, how accurate can your mount track… and every article will say it just depends, and it does, but let’s have a real world example here.
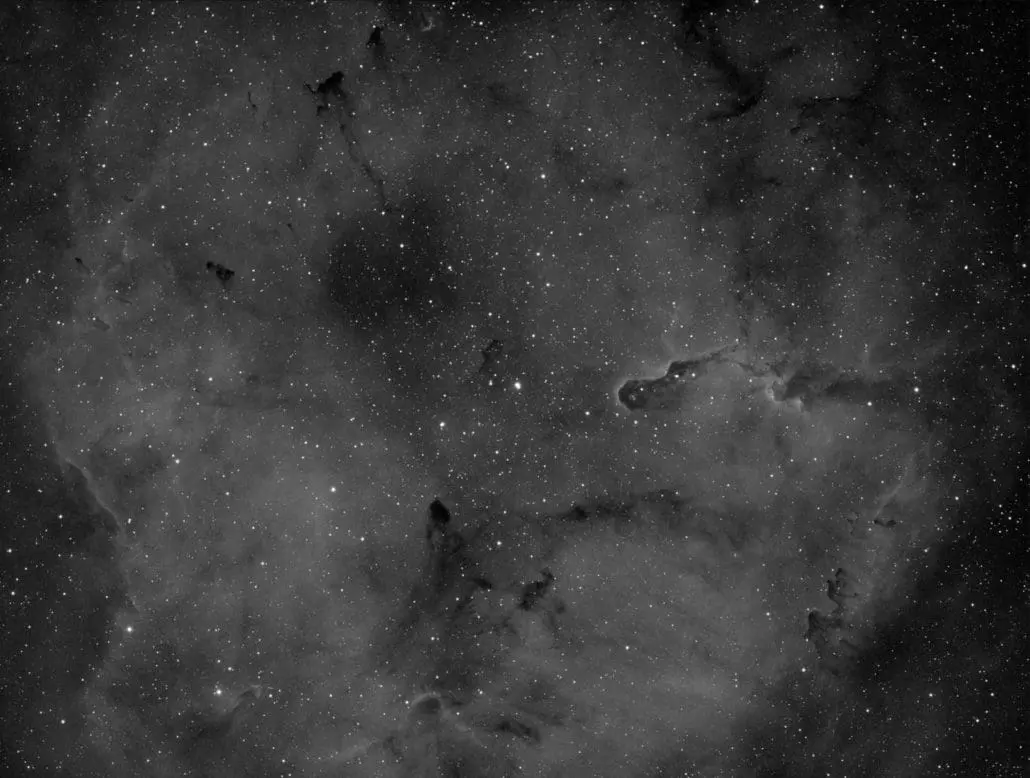
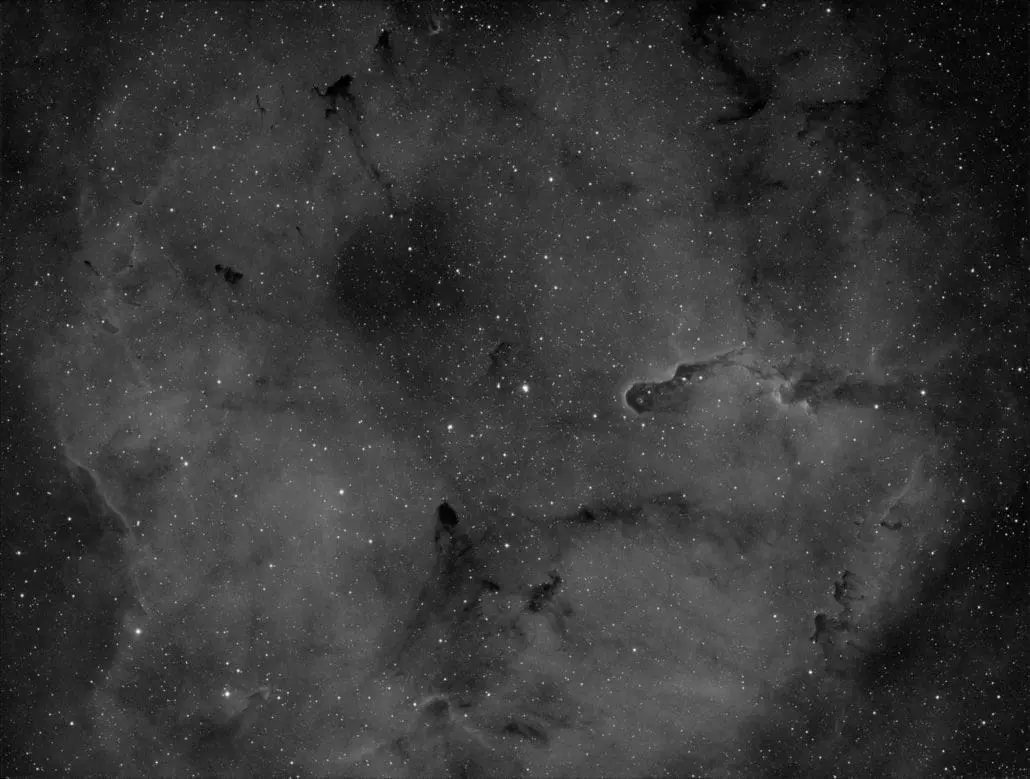
In this scenario, we take 30 minutes worth of images on the same target.
- Same Target
- Same night
- Same optical equipment
- Same temperature
- Same mount
- Stack the images with same software
- It’s not perfect… so don’t blame me if you have different results 🙂
Equipment:
- RASA 8 F/2 with Ha 3.5nm Baader Filter
- EQ6R Pro Mount
- William Optics 50mm guide scope and 290mm ASI guide camera with guiding around .5-.8 RMS
- Inside observatory with no wind or temp issues
- ASI 1600mm pro cooled camera to -20